
I have wanted to understand more about scene graphs for a while, and have decided to give the OpenSceneGraph toolkit a try. This post will describe how I have downloaded and installed both the MinGW compilers, with which I will do the actual (C++) programming, and the OpenSceneGraph toolkit. Being rather firmly rooted in the Windows world, using mainly development tools developed directly for Windows, I am not used to compiling the tools I work with, and if you have solid Unix/Linux experience, a lot of what I write here will probably seem trivial. For those of you in the same position as myself, I hope this post will be informative.
Since the packages used don’t originate from the Windows world, they prefer directory names without spaces. I therefore started by creating the directory “C:Dev”.
MinGW
I navigated to http://sourceforge.net/projects/mingw/files. At the top of the list of files, is a link to the latest version, which I selected. It is only about half a megabyte, so it is not the complete installer. When executed, it shows a rather standard installation dialog. In the “Repository Catalogues” page, I selected to use the pre-packaged repository catalogues. In the “select components” page, I checked “C++ Compiler” (I actually checked the others as well – you never know when you feel like using them). I checked “MSYS Basic System”, although I am not sure if I will ever need it. When the installation started, it downloaded and installed a bunch of stuff, and as far as I can tell it installed only files under C:DevMinGW, which was the directory I chose.
Once I had it installed, I had to add the search path for the compilers (C:MinGWBin) to the PATH environment variable. This page tells you how to do it if you don’t already know. Note: I added the path to my own set of variables (for the user “Johan”), not to the system’s variables.
At this point, I made a simple “sanity check” of the installation by creating a simple C program and compiling it using the gcc.exe compiler.
OpenSceneGraph
I started by downloading CMake, which will be used for compiling the OpenSceneGraph source. I downloaded the latest release as a zip file, which I extracted to the C:Dev directory, giving me a C:Devcmake-2.8.7-win32-x86 directory.
I then downloaded the OpenSceneGraph source code from http://www.openscenegraph.org/projects/osg/wiki/Downloads (here, I chose the latest stable release 3.0.1) in the form of a zip file, which I extracted to C:DevOpenSceneGraph-3.0.1.
The time had then come to build the OpenSceneGraph binaries, and I ran CMake (C:Devcmake-2.8.7-win32-x86cmake-gui.exe). I entered “C:DevOpenSceneGraph-3.0.1” in both the two edit boxes at the top (“Where is the source code” and “Where to build the binaries”). I then clicked “Configure” and specified generator “MinGW Makefiles” in the dialog that popped up (keeping the “Use default native compilers” option selected). When I closed the dialog, CMake worked for a while, and then listed a bunch of variables on red background. Don’t be scared. It looks intimidating, but worked fine for me. I checked the “BUILD_OSG_EXAMPLES” box, changed CMAKE_INSTALL_PREFIX to “C:DevOpenSceneGraph-3.0.1” and left the rest unchanged. The dialog then looked like this:
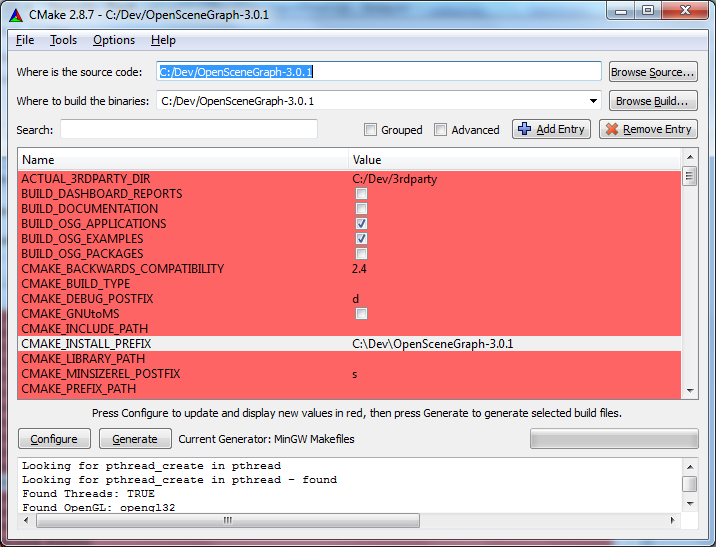
I pressed “Configure” once more, but I didn’t change anything in the new variables that appeared. I pressed “Configure” a third time, and this time there were no red variables left, which I felt sure was a good sign. I clicked “Generate”. The application worked for a while and then reported “Generating done”. I felt happy, and closed the CMake application.
I opened a command window and navigated to the “C:DevOpenSceneGraph-3.0.1” directory. I executed the command “mingw32-make”, which created necessary .obj and .dll files, using make files created in the previous step. This took a while (over an hour on my computer). In the same directory, I then executed “mingw32-make install” which, among other things, built the sample applications.
It was then time to see if things had worked. I navigated to http://www.openscenegraph.org/projects/osg/wiki/Downloads/SampleDatasets and downloaded the example data (“OpenSceneGraph-Data-3.0.0.zip”). I extracted it into my OSG directory, which gave me a directory called “C:DevOpenSceneGraph-3.0.1OpenSceneGraph-Data-3.0.0” (I thought about renaming it to something simpler, but I felt it didn’t really matter). I then navigated to the directory where my sample programs were created (C:DevOpenSceneGraph-3.0.1bin) and executed the following line: “osgviewer.exe C:DevOpenSceneGraph-3.0.1OpenSceneGraph-Data-3.0.0cessna.osg”. A moment later I saw a beautiful aeroplane on the screen, and I used the mouse to view it from different angles before I closed the application using the “Escape” key. For some more tests, I added the path “C:DevOpenSceneGraph-3.0.1bin” to the path variable, as described above. I also added the new variable OSG_FILE_PATH and let it point to the data directory (C:DevOpenSceneGraph-3.0.1OpenSceneGraph-Data-3.0.0). I then ran the “runexamples.bat” file from the OSG directory. A number of the projects didn’t quite work, since I lacked the necessary plugins to load e.g. fonts and jpeg images, but as the examples ran, I realized that I was at a stage where I could start experimenting.